Inside a complete film look
8 min full guideUpdated
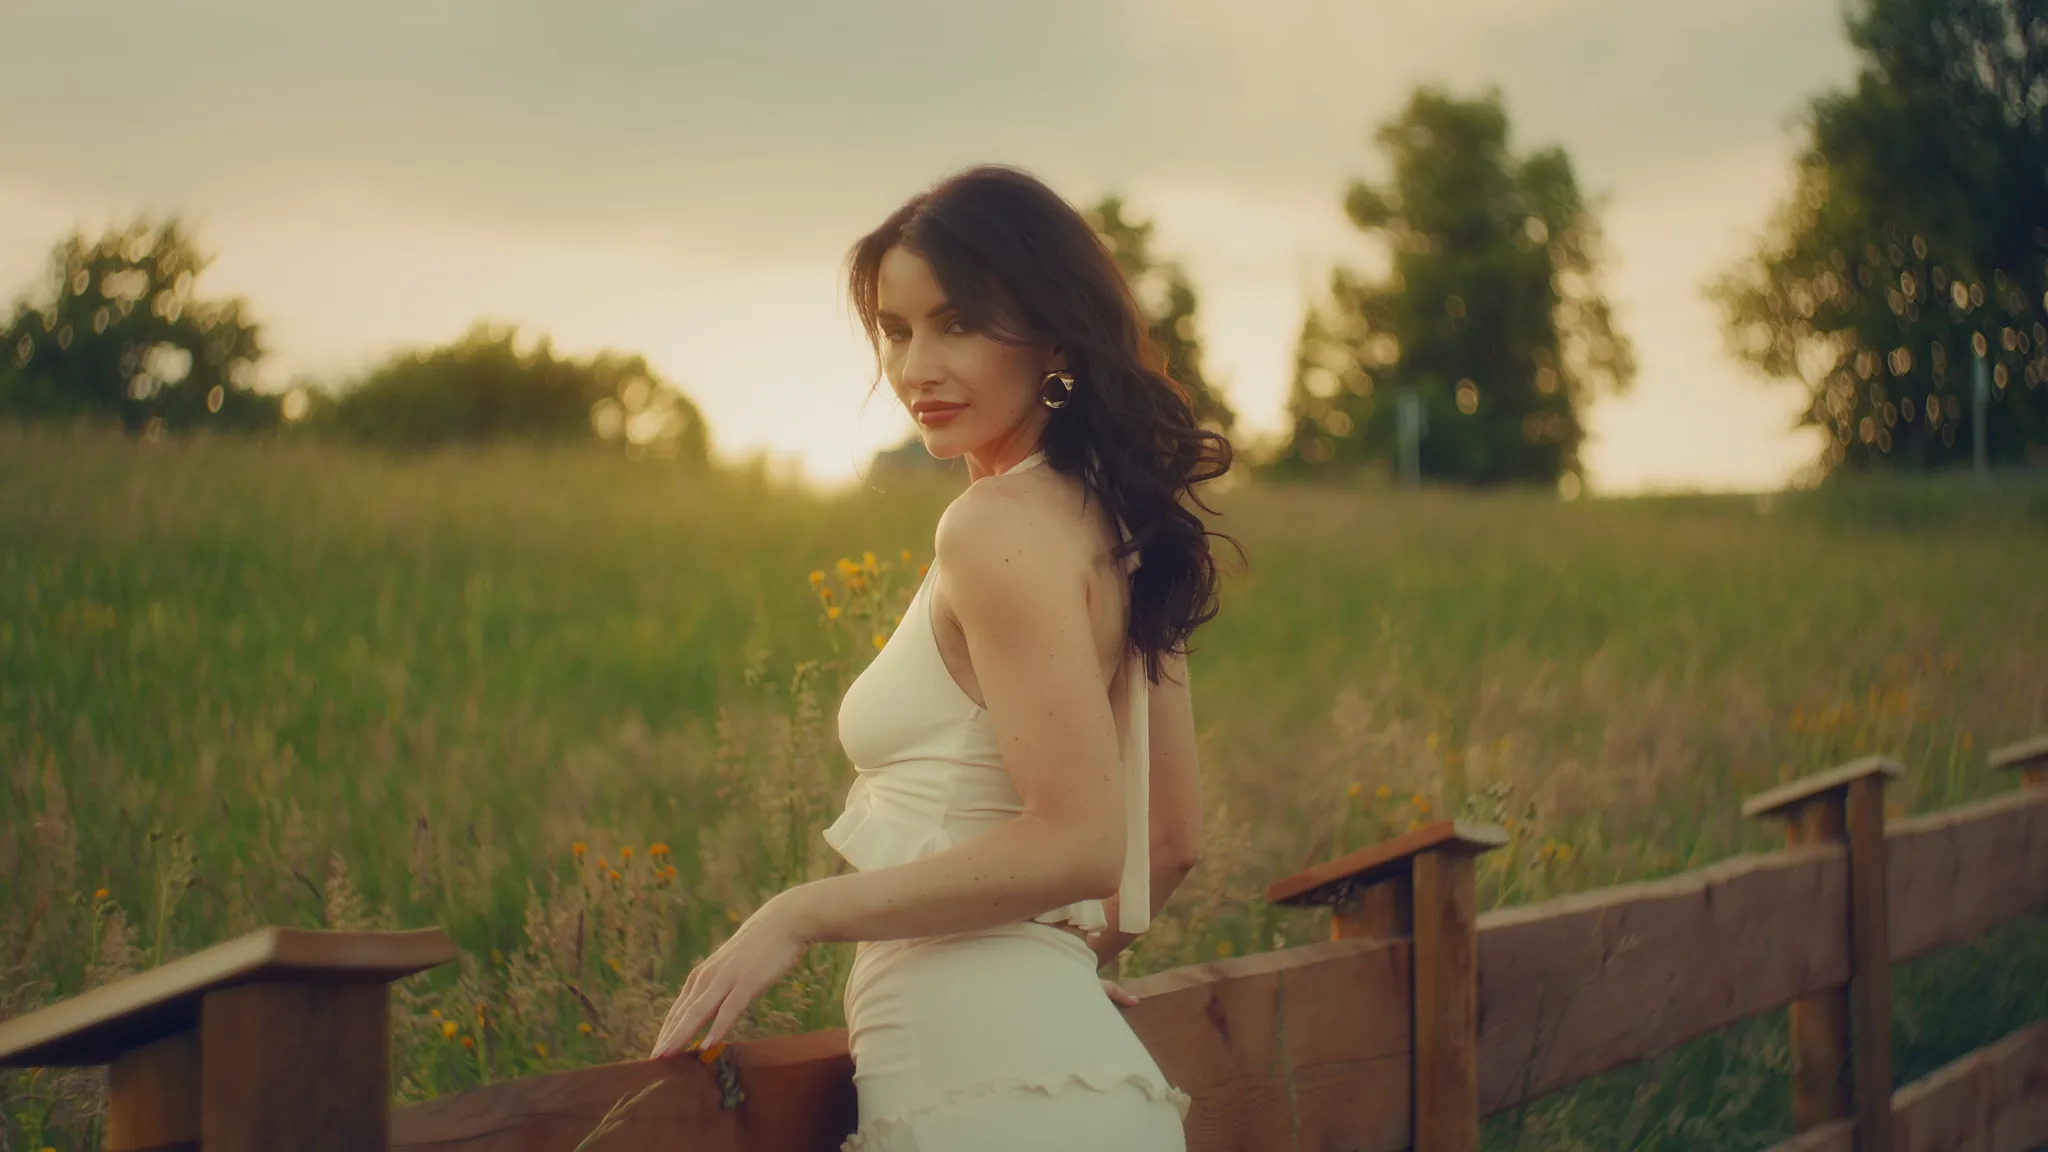
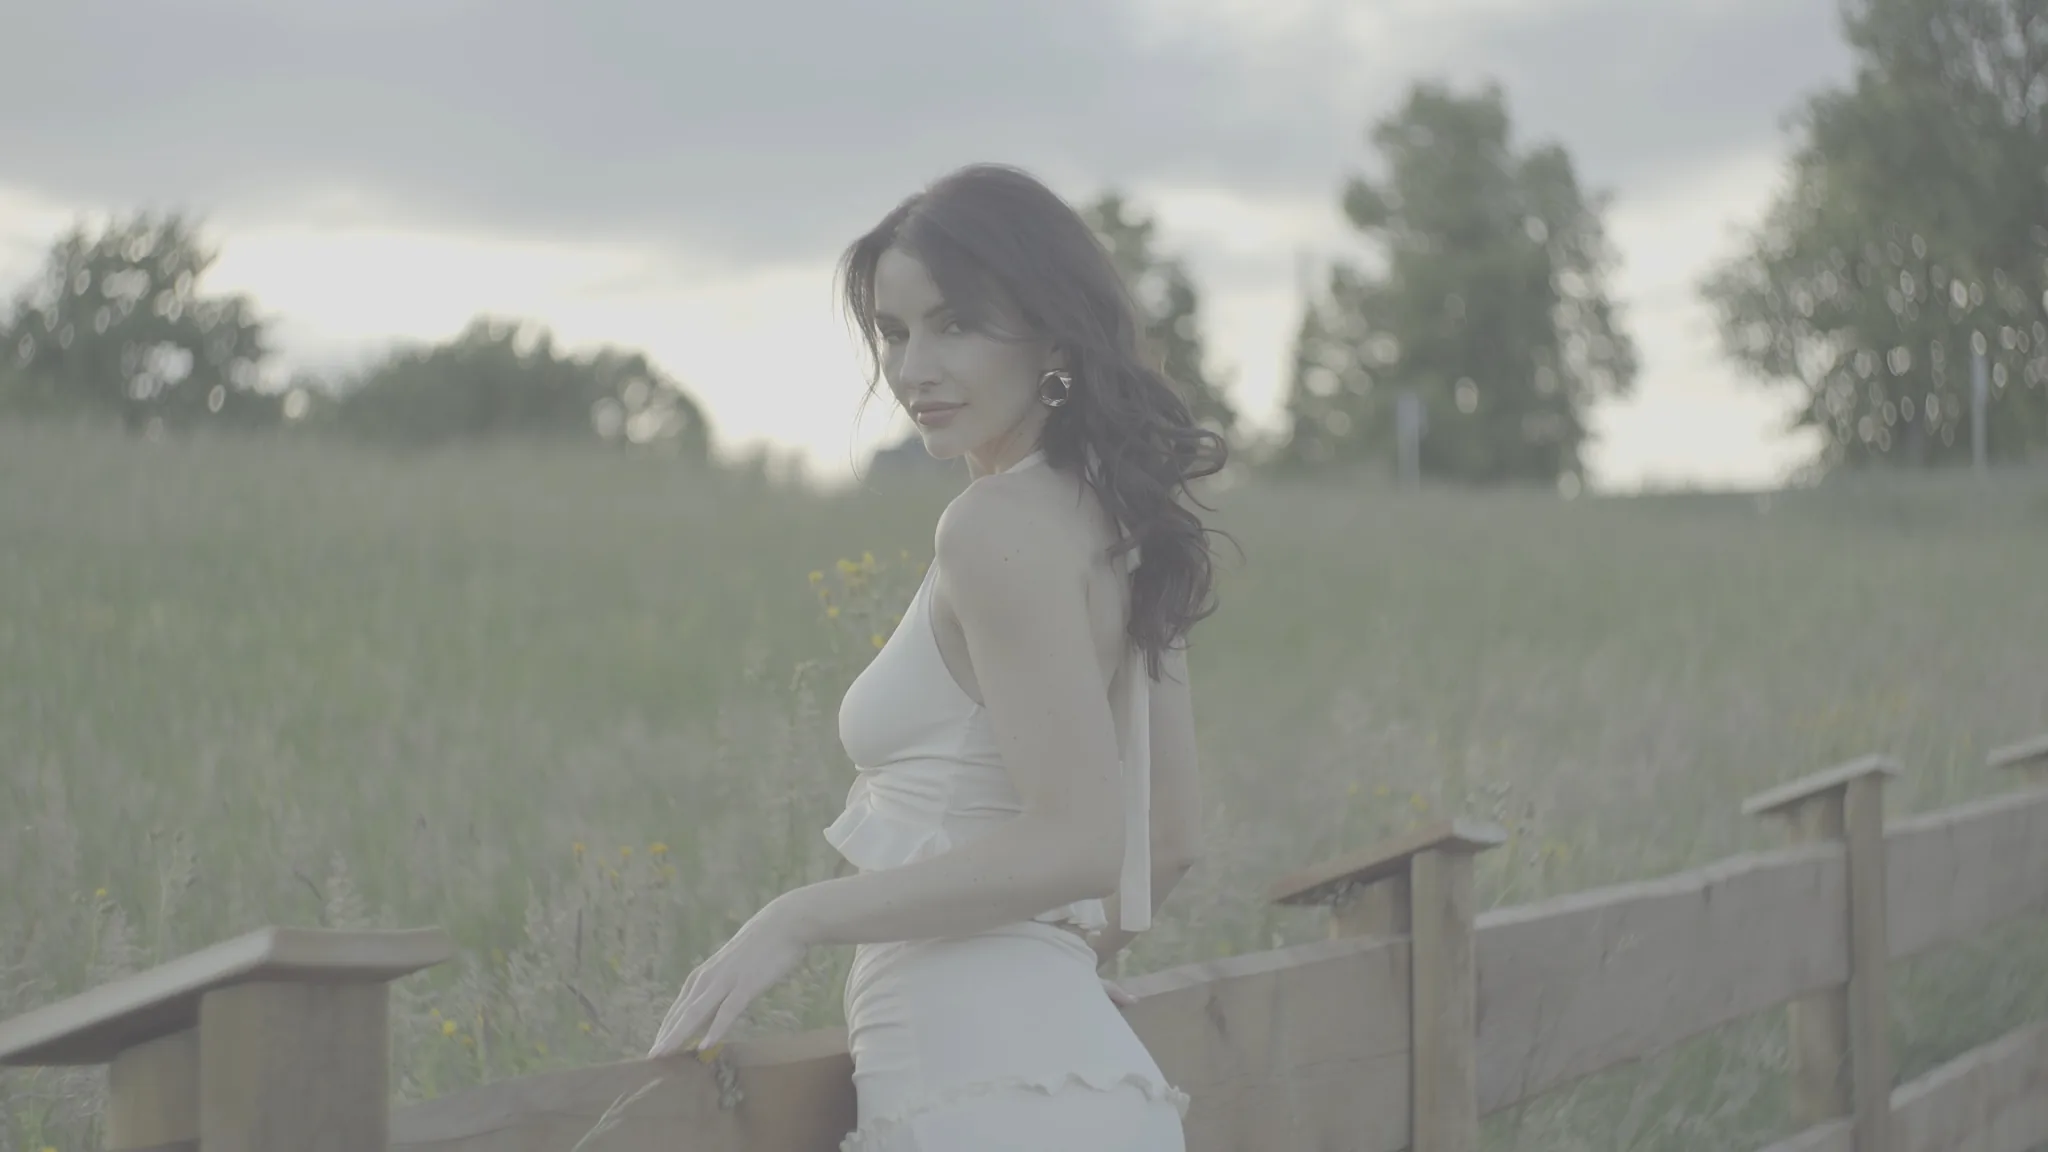
One real grade opened up — every module, every value, and the mask views showing exactly which part of the frame each effect is allowed to touch.
Try it in three steps
- 01Match the input curve and gamut in Setup, or use a CST first and choose Already converted.
- 02Balance the shot, then choose a Film Print and blend it in.
- 03Add Halation, Mist or grain gently. Use mask views and compare one module at a time.
Helios Grade 1.12 setup
Setup → Input Profile: match the camera curve and gamut, or choose Already converted after a CST. Match Working / Output Space. Rec.709 camera inputs offer Helios WDR or Technical; DWG needs a later output transform.
See the input workflow and every tabFull breakdown, settings & downloads
On this page
The example images and downloads preserve the original grade. In 1.12, Film Print appears before Split Tone; nine existing print looks were tuned. Older screenshots may use the previous layout. Check what changed when matching an existing project.
Tell it what it is looking at
Start with Step 1: Timeline Setup. Input Profile describes the pixels arriving at this node, not necessarily the original file. Select the exact camera curve and gamut for supported log footage, or Already converted if Resolve colour management, RAW decoding or an earlier CST has already converted it. Helios does not detect the camera or the timeline colour space for you.
Working / Output Space chooses Rec.709 / sRGB or DaVinci Wide Gamut / DaVinci Intermediate. Technical camera profiles convert into the chosen space before the effects; their Rec.709 output uses Gamma 2.4. With Already converted, this setting must match the incoming signal. DWG output still needs your project's display transform. For DJI D-Log M, apply the camera maker’s conversion LUT upstream and choose Already converted with Rec.709 / sRGB.
What matters either way is that the setting matches the signal. Hand it log while it is set to Rec.709 and the thresholds will all read the wrong levels — highlights that are not highlights, shadows that are not shadows — and every module will behave strangely for reasons that look like bugs and are not.
What each module is touching
Every effect module can show you its own mask — the lighter the pixel, the more that module is affecting it. It is the fastest way to tell whether an effect is doing what you think, and it is worth switching on before you touch a slider rather than after. Tap through them:
The finished frame. Ten modules are on, and not one of them is doing anything you would notice on its own — which is the whole idea.
Almost the entire mask is black. Only the sky and the brightest edge of the treeline are lit, which is exactly right — halation is a highlight effect, and a threshold of 0.775 keeps it off everything else. The amount is 0.054. At that strength you will not see it as a glow; you will see it as the sky no longer having a hard edge against the trees.
Halation — the controls behind it
- Amount
- 0.054
- Radius
- 3.00
- Threshold
- 0.775
- Colour tint
- red
- Green fringe
- 0.000
- Edge isolation
- 0.500
- Softness
- 0.150
A lower threshold than halation at 0.600, so the mask picks up the sky and the brighter grass as well. Radius 30 against halation's 3 — this one is a wide, soft lift rather than a tight bleed at the edges. They are doing genuinely different jobs, which is why both are on.
Glow — the controls behind it
- Amount
- 0.122
- Soft glow
- 0.000
- Threshold
- 0.600
- Radius
- 30.0
- Colour tint
- warm peach
Threshold 0.650 and radius 10. Mist is the atmosphere pass — it takes contrast out of the upper midtones and up, which is what stops a clean digital frame reading as clean and digital. At 0.226 this is the heaviest hand in the whole grade, and it is still under a quarter.
Mist — the controls behind it
- Amount
- 0.226
- Radius
- 10.0
- Threshold
- 0.650
Radius 40, the widest of the four diffusion passes, with a warm tint and saturation pushed to 1.3. This is the one carrying the romance. Threshold sits at 0.500 so it reaches further down the image than the others, which you can see in how much of the field is lit in the mask. Dream Look was removed in plugin version 1.9.0 — it was the same operation as Mist with two extra controls, and those controls are on Mist now. For a similar current-version pass, use Mist Diffusion with Bloom Saturation at 1.3. The original grade also used a separate Mist pass; one current Mist control does not reproduce two historical passes. Judge the balance on the image.
Legacy Dream — the controls behind it
- Amount
- 0.140
- Radius
- 40.0
- Threshold
- 0.500
- Tint
- warm peach
- Saturation
- 1.300
- Contrast
- 0.000
The opposite mask to all the others: it is the detail — grass, hair, the edges of the dress — rather than the bright areas. Worth looking at closely, because this is the mask that tells you whether you are sharpening texture or sharpening noise. Amount 0.132, with refining at 0.481 to keep it off the smooth areas.
Sharpening — the controls behind it
- Amount
- 0.132
- Radius
- 1.310
- Refining
- 0.481
Every mask here is from this frame at these settings. Switch them on in your own grade before you start moving sliders — it is much faster than guessing.
The rest of the recipe
The remaining modules have no mask to show because they work on the whole frame. Anything not listed in these panels is sitting at its default.
Colour science and split tone
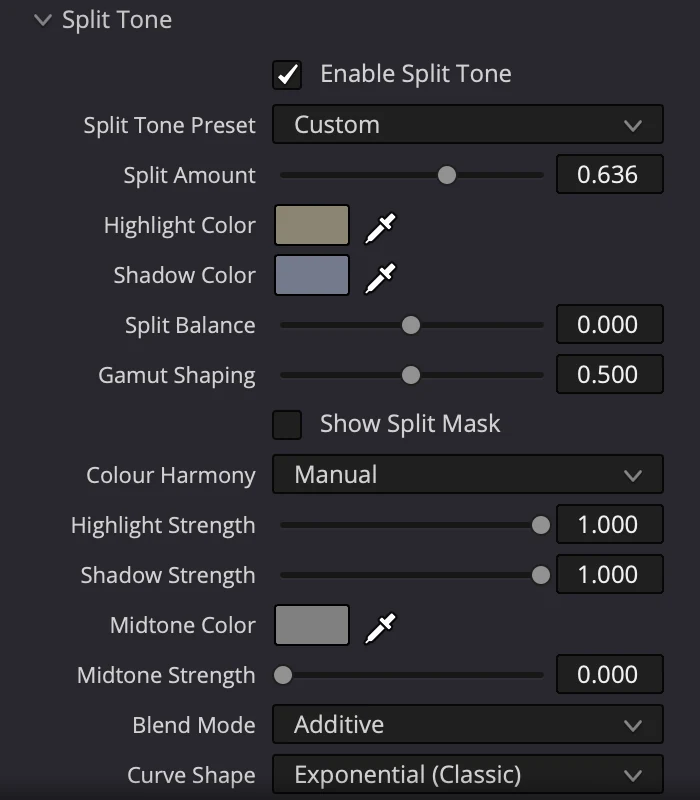
Colour density at 0.085 and nothing else — vibrance, the individual CMY densities and bleach bypass are all at zero. The colour in this frame is coming almost entirely from split tone, which is the one place a big number appears: split amount 0.636, a warm khaki in the highlights against a blue-grey in the shadows, additive blend. That single pairing is doing most of the work people would credit to a LUT.
Print, vignette and grain
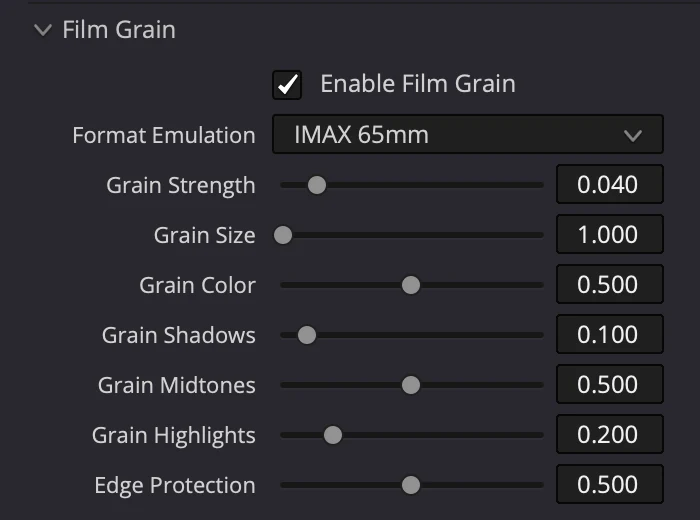
A Kodak 2383 print profile at 0.217 — blended in, not full strength, so it gives the image a stock personality without taking over the grade underneath. Vignette at 0.178, which you will struggle to see on its own and would miss if it were gone. Grain is IMAX 65mm at a strength of 0.040, weighted into the shadows and midtones and largely kept out of the highlights, with edge protection at 0.500 so the fine grass detail does not turn crunchy.
Now look at the numbers again
Every amount in the grade
- Halation
- 0.054
- Grain strength
- 0.040
- Glow
- 0.122
- Sharpening
- 0.132
- Legacy Dream (use Mist)
- 0.140
- Vignette
- 0.178
- Print profile
- 0.217
- Mist
- 0.226
- Split tone
- 0.636
Eight of the nine amounts are under a quarter. The heaviest effect in the entire look is a diffusion pass at 0.226, and the halation everybody associates with a film look is at 0.054 — about a twentieth of the way up its range.
That is the actual lesson, and it is worth more than the numbers themselves. The temptation with a panel full of controls is to turn things up until you can see them working. But an effect you can point at has usually gone too far: the frame stops looking photographed and starts looking processed. Ten modules at a tenth each is a completely different image from two modules at full strength, and the first one is the one that holds up on a big screen.
The current versions of these tools are in Helios Grade, our film-look plugin for Resolve's Color page, and so is the mask view on each module — being able to see what an effect is touching before you commit to it is most of why it exists. It runs free and watermarked with no expiry, so you can put this whole recipe on your own footage before deciding anything.
Free, watermarked, no expiry
Every mask on this page comes from the plugin itself. Seeing which pixels an effect is touching, before committing to it, is most of the reason Helios Grade has a mask view on every module.
₹4,999₹3,999.2020% OFF
Code AUTUMN20
Buy once, use it on up to 3 machines, 15 days to change your mind.